March 2019 Tips - Wanted Person Posters
- ronpillar
- Mar 27, 2019
- 2 min read

Wanted Person Posters
Wanted Person Posters can be created from the Photo Management module of In-Synch RMS. These posters can include photos, demographic information, scars/marks/tattoos, remarks, and caution codes related to the wanted person. 1. To create a wanted person poster, open the Photo Management module from the main RMS toolbar.

2. From the Photo Management window, select the "Lineup Search" option from the Search drop-down.

3. The Selection Criteria window will default with the Attribute of "Person" (A). Choose the "Select" button (B) to start a person search.

Tips:
Juvenile records are automatically excluded from the default search criteria (A). If you wish to search for a juvenile record, you must select the "Clear All" button (B), prior to starting the Person search.

4. Once you have searched (or created) the person record, select the "Choose" button from the Person Management window.

5. Select the "OK" button on the Selection Criteria window.

6. Any photos associated with the selected person record will be displayed in the Photo Management window. Select the "Include" checkbox for each photo you wish to add to the poster. Note: A poster can have up to three (3) photos attached.

7. Select the "Wanted Poster" option from the Posters drop-down.

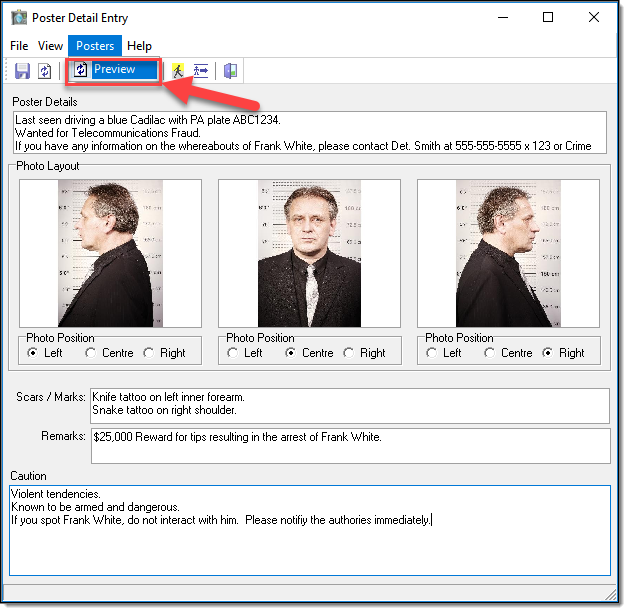
8. On the Poster Detail Entry window, enter the poster details. Note: The poster details field is free-text and can include items such as last known location, involved crimes, bond amount, case number, agency contact information, or other person or agency-specific details.

9. If more than one photo was selected for the poster, you can use the radio buttons in the "Photo Layout" section to select the order of the photos on the printout.

10. The "Scars/Marks" field is free-text and can include items such as scars, marks, tattoos, or other identifiers.

Tips:
There is a "Physical Description" button on the Poster Details Entry window that will display any scars/marks/tattoos associated with the person.
Items found in the "Description Summary" (A) are automatically included in the poster details. The "Physical Markings" section (B) can be used as a reference when entering "Scars/Marks" free-text.
There is also an "Aliases" button available from the Poster Detail Entry window.
This displays any aliases for the person. Aliases are automatically included in the poster details.

11. The "Remarks" field is free-text and can include any additional information.

12. The "Caution" field is free-text and can include items such as warnings, caution codes, etc.

13. Once all of the poster information has been entered, select the "Save" button on the Poster Detail Entry window.

14. The poster can be previewed, by selecting the "Preview" option from the Posters drop-down.
15. "Print" and "Email" buttons are available from the Print Preview window.


Comments